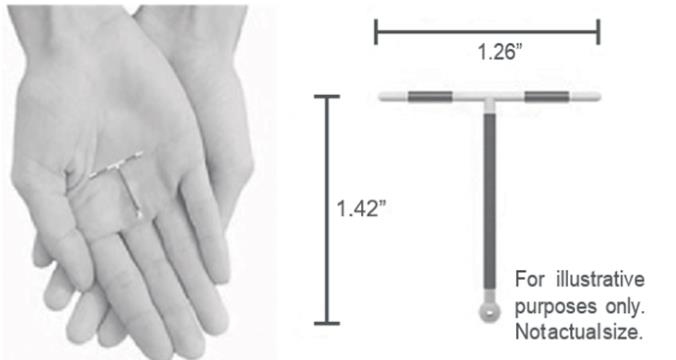
Product Images Paragard T 380a

View Photos of Packaging, Labels & Appearance

Product Label Images

The following 17 images provide visual information about the product associated with Paragard T 380a NDC 59365-5128 by Coopersurgical, Inc., such as packaging, labeling, and the appearance of the drug itself. This resource could be helpful for medical professionals, pharmacists, and patients seeking to verify medication information and ensure they have the correct product.

ParaGard® T 380A Intrauterine Copper Contraceptive (ParaGard®) is a T-shaped intrauterine device (IUD), measuring 32 mm horizontally and 36 mm vertically, with a 3 mm diameter bulb at the tip of the vertical stem. A monofilament polyethylene thread is tied through the tip, resulting in two white threads, each at least 10.5 cm in length, to aid in detection and removal of the device. The T-frame is made of polyethylene with barium sulfate to aid in detecting the device under x-ray. ParaGard® also contains copper: approximately 176 mg of wire coiled along the vertical stem and a 68.7 mg collar on each side of the horizontal arm. The total exposed copper surface area is 380 ± 23 mm2. One ParaGard® weighs less than one (1) gram. No component of ParaGard® or its packaging contains latex. - paragard 01

ParaGard® T 380A Intrauterine Copper Contraceptive (ParaGard®) is a T-shaped intrauterine device (IUD), measuring 32 mm horizontally and 36 mm vertically, with a 3 mm diameter bulb at the tip of the vertical stem. A monofilament polyethylene thread is tied through the tip, resulting in two white threads, each at least 10.5 cm in length, to aid in detection and removal of the device. The T-frame is made of polyethylene with barium sulfate to aid in detecting the device under x-ray. ParaGard® also contains copper: approximately 176 mg of wire coiled along the vertical stem and a 68.7 mg collar on each side of the horizontal arm. The total exposed copper surface area is 380 ± 23 mm2. One ParaGard® weighs less than one (1) gram. No component of ParaGard® or its packaging contains latex. - paragard 01

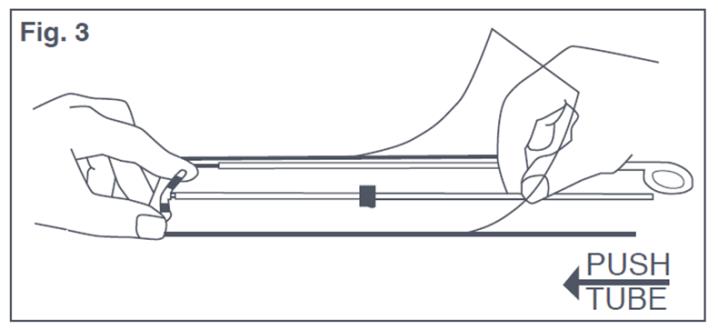
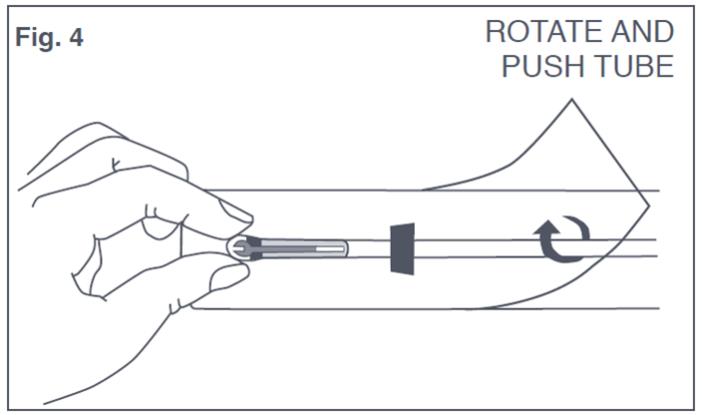
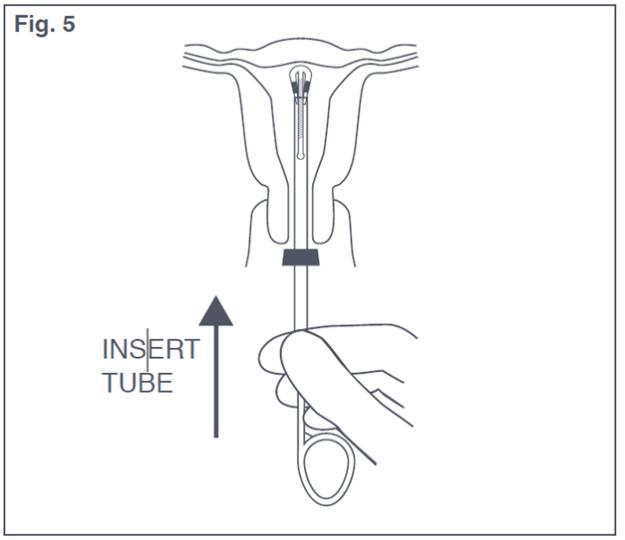
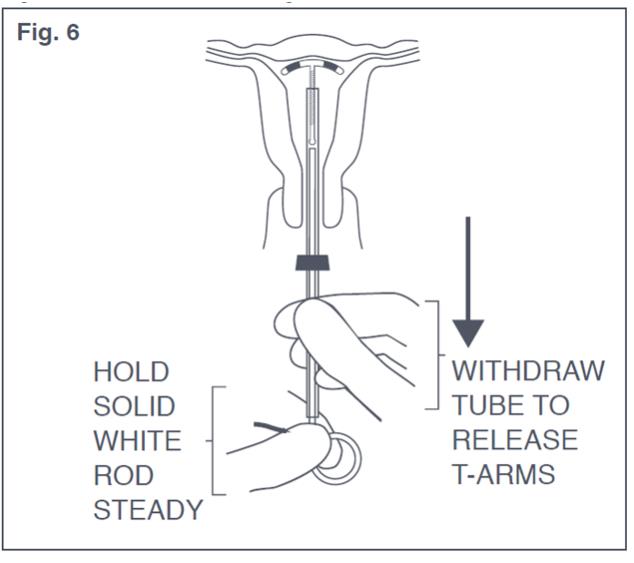
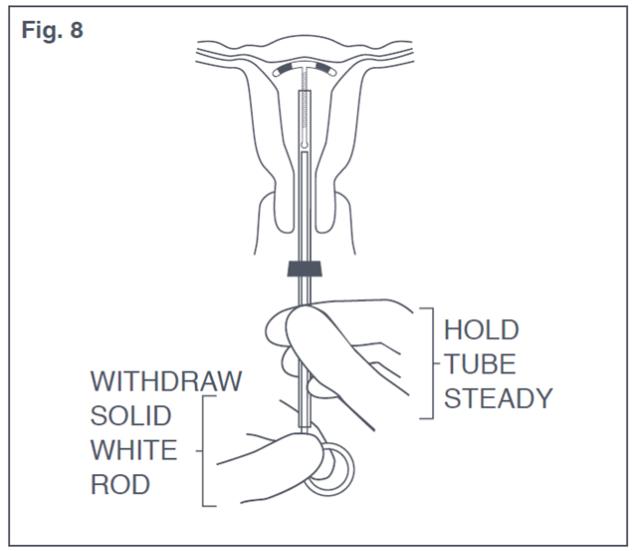
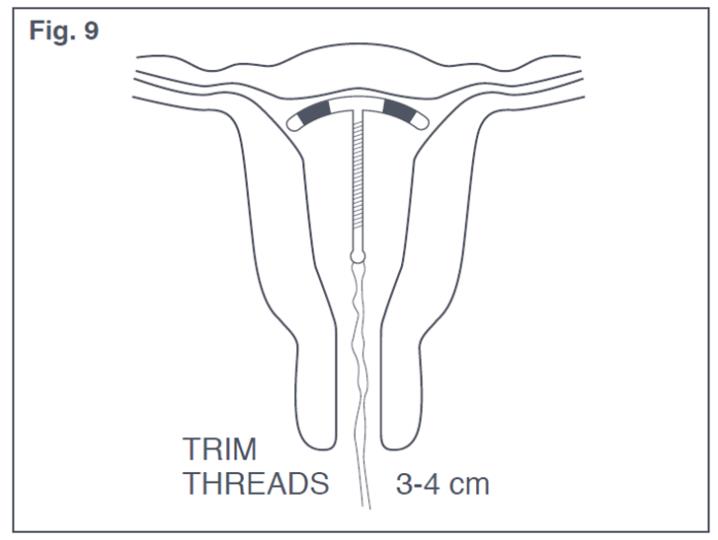
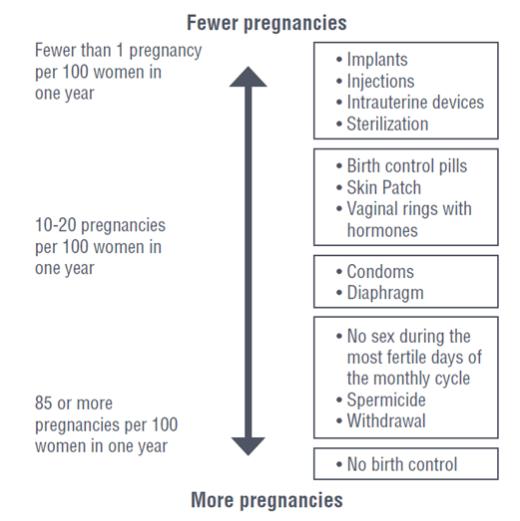
The text appears to be a diagram or a figure with several labels and annotations. It is not possible to generate a useful description using this text.*

If you do not have sterile gloves, you can do STEPS 1 and 2 while ParaGard® is in the sterile package. First, place the package face up on a clean surface. Next, open at the bottom end (where arrow says OPEN). Pull the solid white rod partially from the package so it will not interfere with assembly. Place thumb and index finger on top of package on ends of the horizontal arms. Use other hand to push insertion tube against arms of ParaGard® (shown by arrow in Fig. 1). This will start bending the T arms. - paragard 02

If you do not have sterile gloves, you can do STEPS 1 and 2 while ParaGard® is in the sterile package. First, place the package face up on a clean surface. Next, open at the bottom end (where arrow says OPEN). Pull the solid white rod partially from the package so it will not interfere with assembly. Place thumb and index finger on top of package on ends of the horizontal arms. Use other hand to push insertion tube against arms of ParaGard® (shown by arrow in Fig. 1). This will start bending the T arms. - paragard 02

Bring the thumb and index finger closer together to continue bending the arms until they are alongside the stem. Use the other hand to withdraw the insertion tube just enough so that the insertion tube can be pushed and rotated onto the tips of the arms. Your goal is to secure the tips of the arms inside the tube (Fig. 2). Insert the arms no further than necessary to insure retention. Introduce the solid white rod into the insertion tube from the bottom, alongside the threads, until it touches the bottom of the ParaGard®. - paragard 03

Bring the thumb and index finger closer together to continue bending the arms until they are alongside the stem. Use the other hand to withdraw the insertion tube just enough so that the insertion tube can be pushed and rotated onto the tips of the arms. Your goal is to secure the tips of the arms inside the tube (Fig. 2). Insert the arms no further than necessary to insure retention. Introduce the solid white rod into the insertion tube from the bottom, alongside the threads, until it touches the bottom of the ParaGard®. - paragard 03

Grasp the insertion tube at the open end of the package; adjust the blue flange so that the distance from the top of the ParaGard® (where it protrudes from the inserter) to the blue flange is the same as the uterine depth that you measured with the sound. Rotate the insertion tube so that the horizontal arms of the T and the long axis of the blue flange lie in the same horizontal plane (Fig. 3). Now pass the loaded insertion tube through the cervical canal until ParaGard® just touches the fundus of the uterus. The blue flange should be at the cervix in the horizontal plane. - paragard 04

Grasp the insertion tube at the open end of the package; adjust the blue flange so that the distance from the top of the ParaGard® (where it protrudes from the inserter) to the blue flange is the same as the uterine depth that you measured with the sound. Rotate the insertion tube so that the horizontal arms of the T and the long axis of the blue flange lie in the same horizontal plane (Fig. 3). Now pass the loaded insertion tube through the cervical canal until ParaGard® just touches the fundus of the uterus. The blue flange should be at the cervix in the horizontal plane. - paragard 04

To release the arms of ParaGard®, hold the solid white rod steady and withdraw the insertion tube no more than one centimeter. This releases the arms of ParaGard® high in the uterine fundus (Fig. 4). - paragard 05

To release the arms of ParaGard®, hold the solid white rod steady and withdraw the insertion tube no more than one centimeter. This releases the arms of ParaGard® high in the uterine fundus (Fig. 4). - paragard 05

Gently and carefully move the insertion tube upward toward the top of the uterus, until slight resistance is felt. This will ensure placement of the T at the highest possible position within the uterus (Fig. 5). - paragard 06

Gently and carefully move the insertion tube upward toward the top of the uterus, until slight resistance is felt. This will ensure placement of the T at the highest possible position within the uterus (Fig. 5). - paragard 06

Hold the insertion tube steady and withdraw the solid white rod (Fig. 6). - paragard 07

Hold the insertion tube steady and withdraw the solid white rod (Fig. 6). - paragard 07

Gently and slowly withdraw the insertion tube from the cervical canal. Only the threads should be visible protruding from the cervix. (Fig. 7). Trim the threads so that 3 to 4 cm protrude into the vagina. Note the length of the threads in the patient’s records. - paragard 08

Gently and slowly withdraw the insertion tube from the cervical canal. Only the threads should be visible protruding from the cervix. (Fig. 7). Trim the threads so that 3 to 4 cm protrude into the vagina. Note the length of the threads in the patient’s records. - paragard 08

ParaGard® is made of white plastic in the shape of a “T.” Copper is wrapped around the stem and arms of the “T”. Two white threads are attached to the stem of the “T”. The threads are the only part of ParaGard® that you can feel when ParaGard® is in your uterus. ParaGard® and its components do not contain latex. - paragard 09

ParaGard® is made of white plastic in the shape of a “T.” Copper is wrapped around the stem and arms of the “T”. Two white threads are attached to the stem of the “T”. The threads are the only part of ParaGard® that you can feel when ParaGard® is in your uterus. ParaGard® and its components do not contain latex. - paragard 09

ParaGard® is placed in your uterus during an office visit. Your healthcare provider first examines you to find the position of your uterus. Next, he or she will cleanse your vagina and cervix, measure your uterus, and then slide a plastic tube containing ParaGard® into your uterus. The tube is removed, leaving ParaGard® inside your uterus. Two white threads extend into your vagina. The threads are trimmed so they are just long enough for you to feel with your fingers when doing a self-check. As ParaGard® goes in, you may feel cramping or pinching. Some women feel faint, nauseated, or dizzy for a few minutes afterwards. Your healthcare provider may ask you to lie down for a while and to get up slowly. - paragard 0a

ParaGard® is placed in your uterus during an office visit. Your healthcare provider first examines you to find the position of your uterus. Next, he or she will cleanse your vagina and cervix, measure your uterus, and then slide a plastic tube containing ParaGard® into your uterus. The tube is removed, leaving ParaGard® inside your uterus. Two white threads extend into your vagina. The threads are trimmed so they are just long enough for you to feel with your fingers when doing a self-check. As ParaGard® goes in, you may feel cramping or pinching. Some women feel faint, nauseated, or dizzy for a few minutes afterwards. Your healthcare provider may ask you to lie down for a while and to get up slowly. - paragard 0a

You can also check to make sure that ParaGard® is still in your uterus by reaching up to the top of your vagina with clean fingers to feel the two threads. Do not pull on the threads. - paragard 0b

You can also check to make sure that ParaGard® is still in your uterus by reaching up to the top of your vagina with clean fingers to feel the two threads. Do not pull on the threads. - paragard 0b

The given text shows statistics related to women's health. It includes the number of women at the beginning of the year and percentages of different medical events. However, the meanings of the percentages and other necessary information are not clear. Therefore, a useful description cannot be generated from this text.*

PRINCIPAL DISPLAY PANELPARAGARDIntrauterine Copper Contraceptive1 Unit - paragard 0c

PRINCIPAL DISPLAY PANELPARAGARDIntrauterine Copper Contraceptive1 Unit - paragard 0c

This data is not sufficient to generate a useful description. It appears to be a table or chart with numerical values and categories, but there is no clear context or explanation.*

paragard 0d

paragard 0d

The text is indicating two sizes, "1.26" and "1.42"" and that they are for illustrative purposes only, and not actual size.*

paragard 0e

paragard 0e

This text describes different birth control methods and their effectiveness in preventing pregnancy. It shows that using methods such as implants, injections, intrauterine devices, sterilization, birth control pills, skin patches, vaginal rings with hormones, condoms, and diaphragms can significantly reduce the chances of getting pregnant. It also suggests methods such as no sex during the most fertile days of the monthly cycle, spermicide, and withdrawal may offer some protection against pregnancy. The text presents statistics on the number of pregnancies per 100 women in one year for each method.*

paragard 0f

paragard 0f

Paragard is a birth control device that is placed inside the uterus. It has threads that protrude into the vagina for easy removal.*

paragard 10

paragard 10

Paragard refers to a type of intrauterine device (IUD) that is inserted into the uterus for birth control purposes. The text suggests that after the IUD is inserted, short threads are left hanging from the cervix of the woman. The threads are placed there so that she can confirm that the IUD is still in its proper position. The text advises that the woman should be able to feel the threads using her fingers.*

paragard 11

paragard 11

Paragard is an intrauterine copper contraceptive.*

* The product label images have been analyzed using a combination of traditional computing and machine learning techniques. It should be noted that the descriptions provided may not be entirely accurate as they are experimental in nature. Use the information in this page at your own discretion and risk.